Archive for the ‘carpentry’ Category

V-Berth Rebirth (with strong opinions about drawers on boats)

Clark March 20th, 2017

IMG_1544
Like many V-berths, mine was designed to be two bunks, but by putting a board and a cushion between them it becomes a double berth. Since the cushion in the middle is called a keystone cushion by the upholstery people, we’ll call the board the keystone board.

On my boat the keystone board and cushion are in place nearly 100% of the time, creating my captain’s cabin, roughly the size of a queen-sized bed. Below the keystone board is seldom seen, but this is some primo storage, accessed from aft, and visible looking forward from the main cabin. During my circumnavigation it was home to my bike and my guitar. In the photo above it is occupied by a shop vac, and a baby lies on the keystone cushion.

Recently I cleared out the V-berth to replace the opening ports, and upon seeing below the keystone board for the first time in years, decided to gut and rebuild the V-berth.

First, though seldom seen, it’s all unsightly. The teak veneer is peeling off the plywood, and once plywood gets to this point there’s not much to be done for it cosmetically:
IMG_2772

Second, below the keystone board, on both sides, are a drawer, a cabinet, and a cubbyhole, none of which are accessible with the board in place and the bed made up:
IMG_2767

The cabinets are innocuous, but the cubbyholes are useless, and the drawers are a complete waste of space. I did away with the drawers long ago, keeping only the drawer fronts, fastened from behind:
IMG_2768

Drawers are never an efficient use of space on a boat, but of course they’re the best for convenience. A boat should definitely have a few drawers around, especially in the galley, but anyplace you put a drawer you’re giving up some overall space in exchange for that convenience. Drawers are square and boats are round, so a drawer never takes full advantage of the volume it occupies. Then add all the support structure a drawer requires, and you’re probably looking at halving, or worse, the volume of a storage space by subdividing into drawers. In my V-berth, for example, the large, deep compartments under each berth were completely blocked off – interrupted – by the drawers and their supporting structures.

I found while cruising that larger storage spaces, big enough for a sail or an outboard motor, were the hardest to come by. Smaller items can always find a home. By ripping out my drawers I opened up some big new storage spaces, but they could only be accessed from above, meaning moving a mattress and bedding.

Finally, they say with fiberglass boats of certain vintage they built wooden boats inside of fiberglass boats. This was especially true at the foot of my V-berth, the forward part, where they’d built a wooden boat inside a fiberglass boat, then changed their minds and did it a second time inside the first, then threw in some fake bulkheads and terrible access. This was the only entry:
IMG_2765
By gutting it and rebuilding it this:
IMG_2762

…was replaced by just the two unpainted beams running athwartships, opening about two cubic feet of previously-unused storage space:
IMG_2626

So my new design would have no drawers, cabinets, or cubbyholes. The only access to the storage would be from above, from under the bunks, but I’d want plenty of ventilation, so I put in five of these round vents:
IMG_2743

Finally, the boards under the bunks didn’t allow for very good top access, since they assumed the whole space would be occupied by the drawers. I made templates and then cut new boards from a sheet of half inch marine plywood. I think it’s a good idea to have lots (6) of smaller boards for access, rather than fewer larger boards, and to divide starboard from port so you can open the bedding like a book and get to one side of the storage. It would be tempting to have the boards at the foot of the bunk (forward) be one piece, but then you’d have to move, or bend up both mattresses:
IMG_2745
I made the aft boards the smallest, so I can get to them from a standing position, while lifting up the head of one mattress:
IMG_2750

Of course I varnished all the new work and everything else in there. I spray painted all the headliner panels years ago. It was time to do it again:
IMG_2754

You’ll notice I didn’t show you the final product with the cushions back in place? That’s because the cushions are also fifty years old, but that’s a project for another day.
New Steering Wheel Adventure: Part 2

Clark March 30th, 2015


In Part 1 we discussed how I got myself into this mess in the first place. Now we’re into the heart of the mess. Upon reflection, this is the most serious marine carpentry project I’ve ever got myself into. I’ve taken on some big marine carpentry projects, but they were large areas to be fiberglassed or painted, so there was more room for error. In this project, rebuilding the teak steering console, everything will be varnished and in plain sight, so there is really no room for error: Every joint must be perfect.

The old console was still structurally sound, except for some rot around the base that I saturated with epoxy and glassed over years ago. But cosmetically it was too bad to put back into place. The nearly fifty-year-old teak veneer on the plywood had peeled back in many places:

Ugly:

Uglier:

Ugliest:

And there were a few things I didn’t like about the old console: It had many holes cut into it for various gauges, instruments, and outlets, some still in use, some not. One of these was an AC outlet about six inches above the cockpit sole, meaning it would be soaked in even a minor cockpit flooding. Also, at the bottom of the console was a (non-watertight) door, and behind that door was the main electrical panel, and at the very bottom, in what was a continuation of the cockpit sole inside the console, were the main battery switches. All of this stuff could have been catastrophically soaked in a cockpit flooding. During a ten year circumnavigation through a tropical storm, multiple tsunamis, a Horn rounding, and two crossings of the Drake Passage it never got flooded, but it could. Therefore, this project will involve largely re-wiring the boat, but we’ll save that for Part 3.

So I was off to MacBeath Hardwoods to buy myself a sheet of 3/4-inch teak fronted plywood. I only needed a half sheet, but a half sheet was $180 while a full sheet was $220, and I’m no fool. But here is where I learned my first lesson about fine plywood: I had to have them cut it in half to fit it in the Subaru, and their panel saw took the veneer off in places:

It’s a known thing among finish carpenters that the factory edges on plywood are always straight, but seldom useable: You figure your 4 x 8 foot piece of plywood will have to lose an inch or so all around to get clean edges.

So, how do we get a nice, clean edge on our teak-fronted plywood, without chips missing, and without “shag?” We use a table saw, for starters, and put on a new, fine-toothed blade:

On top is the course blade; below is the fine, new blade I’ve just swapped out.

Cleaner cuts are made by lowering the blade so it just barely cuts through the top of the plywood, thus cutting the plywood at a shallow, oblique angle:

There are other tricks, but I found after a few cuts that the new blade at a low angle gave me good results. I’ve read that you can put masking tape over the line you’re about to cut, but then I’ve read that the tape can lift up the veneer in places. I was also advised to score the surface with a utility knife, right along the cut line. I tried this and it worked, but not much cleaner than just cutting with the good blade.

From the pieces of the disassembled old console I copied, as best I could, each section. I thought I’d been very precise, but with this kind of carpentry, even 1/32 of an inch can change the geometry or be unsightly. In this vein, another little trick I figured out is to angle the blade a little while cutting. On most table saws you can change the angle of the blade, so I just gave it 5 or 10 degrees. In this photo it’s slightly exaggerated to make the point:

To show it in practice, a crude diagram, in which the angles are also exaggerated:

The outside corner is the part that will show. Obviously this is still a butt joint and we want reasonable surface area of contact, but there are no right angles on boats, so if something is a little off, as it invariably will be, it’s better that gap is where it doesn’t show rather than where it does. Unfortunately the blades on most tables saws only angle one way, so you have to think this through before you make your cuts.

Once you cut your teak-fronted plywood it should be treated with great care. All it takes is a casual swipe of one of the edges at the wrong angle and you’ve got splinters and shag hanging off and a piece unfit for installation (I know this).

Back to the boat. The two sides of the old console were tabbed in with fiberglass, so I repeated this with my new sides:

I had to put the middle pieces in place temporarily, just to get the geometry right:

I was very happy with this day’s work, and I’d got all cleaned up and ready to leave, when I fit a couple of the neighboring pieces of teak into place and realized the whole mess was canted way over to starboard. Luckily the epoxy was still wet, or this would have been a catastrophic error in judgment, and much of my hard work would have had to be ripped out. I had to use the boom vang tackle to crank the whole magilla way back to port, and left it under tension overnight while the epoxy dried.

Next it was on to the slanted box thingy that houses the steering chain. Of course I’d removed the rusty, crusty, 48-year-old steering chain and let it soak in diesel for about a month.

This is where things got weird. Nothing was square. Even the fiberglass front of the cockpit slopes a bit. The chain box has to meet this sloping surface, mate with the rest of the console perfectly, then exit the cockpit through the cutout in the hatch to port. I thought I’d copied the old pieces closely, but for this kind of work close isn’t enough. It has to be a perfect fit. I trimmed things here and there with a belt sander, but 1/64 of an inch shaved off in one place would change the geometry of the whole box once again. The front of the box even tapers: you’ll notice the inboard end, which mates with the console, is skinnier than the outboard end, which exits through the hatch. Nothing was square! I’m not even sure if the laws of gravity applied.

It may not look like much, but that was a whole afternoon’s work just to get that box thingy to look right.

Next I painted the inside of the console with gray bilge paint. Why do we paint parts of boats that will never been seen or see the light of day? I don’t know:

Next I mounted the customized, rebuilt, and repainted steerer in the front of the console, hooked on the chain, and mounted it:


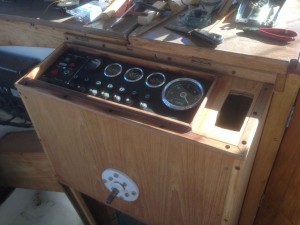
To crown it all is the woodwork around the instrument cluster and throttle/shifter, which looks simple, but it’s actually twenty different pieces of wood. I used the old pieces, where possible, but had to build most of it from scratch, and this took me three separate visits to the boat. I’ve got two babies at home, so boat work is done in stolen chunks of 1-2 hours, if I’m lucky. Remember how I said that 1/32 of an inch makes a big difference in the geometry? Here’s where things getting a little off, from old to new, comes to a head:

I had to shave down that tapering piece of teak, about 1/8-inch at its thickest, to make up for things gone wrong elsewhere. The instrument cover wouldn’t close without it, but as long as the cover is closed the patch won’t show.

And that delicate edge problem with teak? I managed the bang this piece once it was in place, so I’m just going to live with it. I’ll think of some creative way to patch it, something better than wood putty, I hope:

Here is the new (another story we’ll save for Part 3) instrument cluster in place:
IMG_1461

As far as the carpentry part, the console is done except for plugging all the screw holes with teak plugs, sanding, and finishing, which I’ll phase in with re-doing the wiring. I’m pretty sure I started this project in earnest in December. It’s now almost April. Sigh.